
Did you know that insulating your bushcraft shelter properly can make all the difference when it comes to staying warm in cold weather?
While many people think that simply building a shelter is enough, insulating it can help to retain heat and keep you comfortable even in the harshest conditions.
But where do you start? In this discussion, we will explore the various methods and materials you can use to insulate your shelter, from the floor to the roof, as well as how to seal any gaps or drafts.
By the end, you’ll have all the knowledge you need to ensure a cozy and warm shelter in the great outdoors.
So, let’s get started!
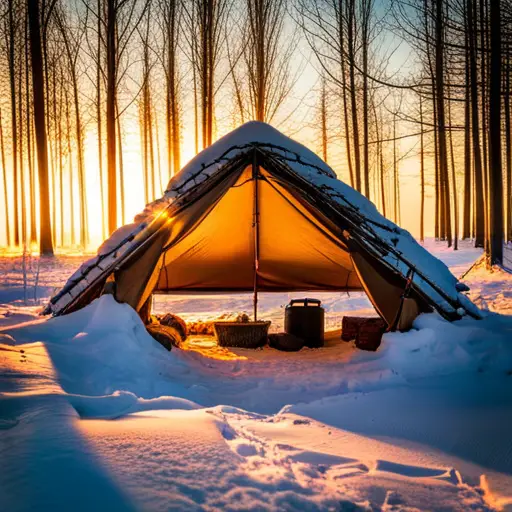
Choose the Right Shelter
When selecting a shelter for your bushcraft adventures, it’s important to choose one that meets your specific needs and provides adequate protection from the elements. The right shelter can make all the difference in your outdoor experience, ensuring your safety and comfort.
There are a variety of shelters to choose from, including tents, hammocks, and tarps. Consider factors such as the weather conditions, terrain, and duration of your trip when making your decision.
If you expect to encounter heavy rain or snow, a waterproof and windproof tent would be a suitable choice. Tents provide a secure and enclosed space, shielding you from the elements. They come in various sizes, so make sure to choose one that accommodates your needs and allows for easy setup.
For those who prefer a lightweight and minimalist option, a hammock can be a great choice. Hammocks are particularly useful in areas with limited ground space or uneven terrain. They provide a comfortable and elevated sleeping area, away from bugs and damp ground.
Another option to consider is a tarp shelter. Tarps are versatile and lightweight, making them ideal for backpacking trips. They can be set up in various configurations, providing protection from rain or sun. Tarps offer a more open and spacious shelter compared to tents or hammocks, allowing for better airflow. However, they may not provide as much insulation or privacy.
Ultimately, the choice of shelter will depend on your personal preferences, the expected weather conditions, and the specific requirements of your bushcraft adventure. It’s important to thoroughly research and test your chosen shelter before embarking on your trip to ensure that it meets your needs and provides the necessary protection from the elements.
Select Insulation Materials
What are the best insulation materials to use for your bushcraft shelter?
When it comes to insulating your shelter in cold weather, choosing the right materials can make a significant difference in keeping you warm and comfortable. There are several options available, each with its own benefits and drawbacks.
One of the most commonly used insulation materials is natural materials, such as leaves, grass, and pine needles. These materials are abundant in the wilderness and provide good insulation when packed tightly. They’re also lightweight and easy to find, making them a convenient choice for bushcraft shelters.
Another option is animal fur, which has excellent insulation properties. If you have access to animal hides or furs, using them as insulation can provide great warmth. However, keep in mind that this method may not be suitable for everyone due to ethical and practical considerations.
Synthetic materials like foam pads and sleeping bags can also be used as insulation in your bushcraft shelter. These materials are designed specifically for insulation and provide excellent warmth. They’re lightweight, easy to pack, and can be reused multiple times.
Ultimately, the best insulation material for your bushcraft shelter will depend on your needs, availability, and personal preferences. Experimenting with different materials can help you find what works best for you in different weather conditions. Remember to prioritize warmth and comfort when selecting insulation materials for your bushcraft shelter.
Insulate the Floor
To insulate the floor of your bushcraft shelter, consider using natural materials like leaves, grass, and pine needles. These materials are readily available in most outdoor environments and can provide excellent insulation.
Start by clearing the floor of any debris or sharp objects that could puncture your insulation layer. Then, gather a thick layer of leaves and spread them evenly across the floor. Leaves are lightweight and provide great insulation due to the air pockets they create.
Next, add a layer of grass or pine needles on top of the leaves. Grass and pine needles have natural oils that help repel moisture, keeping you dry and warm. Make sure to pack the materials tightly to prevent them from shifting or blowing away.
Additionally, consider using a groundsheet or tarp to further protect your insulation from moisture.
Insulate the Walls
Consider using natural materials such as branches, moss, and mud to insulate the walls of your bushcraft shelter. Insulating the walls is crucial in keeping the cold air out and the warmth inside.
Start by gathering branches of different sizes and placing them vertically against the walls. This creates an additional layer that helps trap heat.
Fill in the gaps between the branches with moss, which acts as a natural insulator. Moss isn’t only abundant in many outdoor environments but also retains moisture, which further aids in insulation.
Once the moss is in place, cover it with a layer of mud. Mud acts as a barrier against cold air and provides additional insulation. You can easily create mud by mixing water with soil or clay found in the area. Use your hands to spread the mud evenly over the moss, ensuring complete coverage.
Allow the mud to dry and harden, forming a protective layer that helps retain heat.
Insulate the Roof
Now, let’s focus on ensuring the warmth stays inside your bushcraft shelter by insulating the roof.
Insulating the roof is crucial in maintaining a comfortable temperature and preventing heat loss. One effective way to insulate the roof is by adding a layer of insulation material between the roof beams or rafters. This can be achieved by using materials such as foam boards, fiberglass, or natural materials like straw or grass.
Make sure to measure the space accurately and cut the insulation material accordingly to fit snugly between the beams. Additionally, you can cover the insulation with a vapor barrier to prevent moisture from seeping in.
Another method is to use a reflective insulation material, like aluminum foil, which can reflect the heat back into the shelter. Simply attach the foil to the underside of the roof using adhesive or staples. Remember to seal any gaps or cracks to prevent drafts.
Seal Any Gaps or Drafts
Check for any gaps or drafts in your bushcraft shelter and seal them properly to prevent heat loss and maintain a comfortable temperature inside.
Insulating your shelter is essential, but if you leave gaps or drafts unsealed, all your efforts will go to waste. These tiny openings can let in cold air, allowing heat to escape and making your shelter ineffective against the cold.
To ensure maximum insulation, carefully inspect your shelter for any gaps or drafts. Start by checking the walls, windows, doors, and even the floor. Look for cracks, holes, or any areas where air might be able to sneak in.
Once you’ve identified these problem areas, it’s time to seal them up. Use weather-stripping or caulking to fill in any gaps or cracks. For larger openings, consider using insulation boards or foam panels to create a tight seal. Pay extra attention to the corners and edges, as these are common spots for drafts.
Consider Additional Heating Options
To enhance the warmth inside your bushcraft shelter, explore additional heating options that can effectively maintain a comfortable temperature. While insulating your shelter helps retain heat, having a reliable heating source is crucial during cold weather.
One option is a wood-burning stove, which not only provides warmth but also allows you to cook food and boil water. Look for a lightweight and compact stove that’s easy to transport and set up.
Another option is a portable propane heater. These heaters are convenient and emit a steady flow of heat, ensuring that you stay warm throughout the night. However, be cautious when using propane heaters as they require proper ventilation to avoid carbon monoxide buildup.
Additionally, you can consider using a hot water bottle or microwavable heating pads to warm up your sleeping bag. These small and lightweight items can provide localized warmth and make a significant difference in cold temperatures. Remember to handle them with care to prevent burns.

Bushcraft Techniques, authored by Darell Strouth, is an insightful guide that delves into the art of surviving and thriving in the wilderness. Drawing on his extensive experience and passion for the outdoors, Strouth offers practical advice and innovative strategies for mastering bushcraft skills. His website, BushPath.com, serves as a valuable resource for enthusiasts, featuring a wide range of tips, tutorials, and insights into the world of wilderness survival and nature exploration.